US English (US)
SR Serbian

Contact Us

If you still have questions or prefer to get help directly from an agent, please submit a request.
We’ll get back to you as soon as possible.

Please fill out the contact form below and we will reply as soon as possible.

  • Contact Us
English (US)
US English (US)
SR Serbian
  • Home
  • CloseOut Web App
  • Administration
  • Administration of Templates
  • Managing Workflow

How to create a Checklist

Written by Lada Paunovic

Updated at April 18th, 2022

Contact Us

If you still have questions or prefer to get help directly from an agent, please submit a request.
We’ll get back to you as soon as possible.

Please fill out the contact form below and we will reply as soon as possible.

  • CloseOut Web App
    Getting Started Dashboard New Tasks GIS Works Navigator Control Panel Monitoring Work Scheduler Reports Video Time Tracking Time Validation Administration Security Notifications
  • CloseOut Mobile App
    Android iOS
+ More

Checklists can include single, multiple-choice lists, or free-text form answers to a question that you can create for field technicians.

To create a checklist in the project workflow:

  1. Log into CloseOut.
  2. In the Administration tab select Templates.
  3. Click the project workflow that you want to edit or create. 
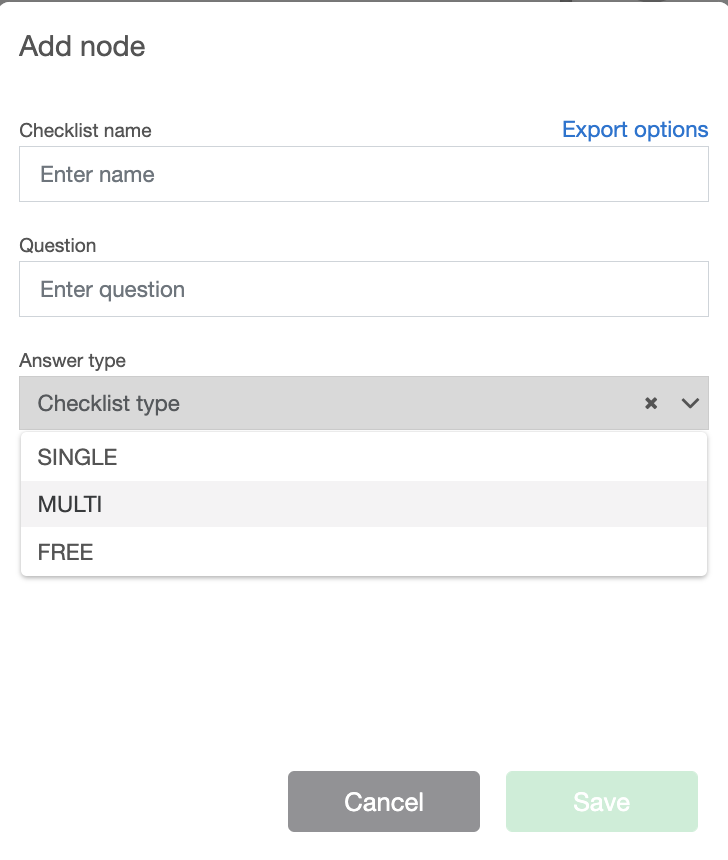
  4. On the right panel, click the + (Add node) button, and select Checklist.
  5. Fill out the Name of the checklist, Question 
  6. Choose the type of checklist.

Types of Checklist:

Single - the fieldworker can choose only one answer out of the options that you provide
Multi - the fieldworker can choose multiple answers out of the options that you provide
Free: 
-Text value: practical for daily reports, it allows typing in the text in the free form;
-Date value: choose if the fieldworker should only enter the date, the calendar will appear on the mobile phone;
-True/False: preset true and false options for a fieldworker to choose on the mobile phone;
-Decimal number, for entering length, height, or any other information in decimal number;
-Integer number, for any information in round number. The number keyboard will appear on the mobile phone.


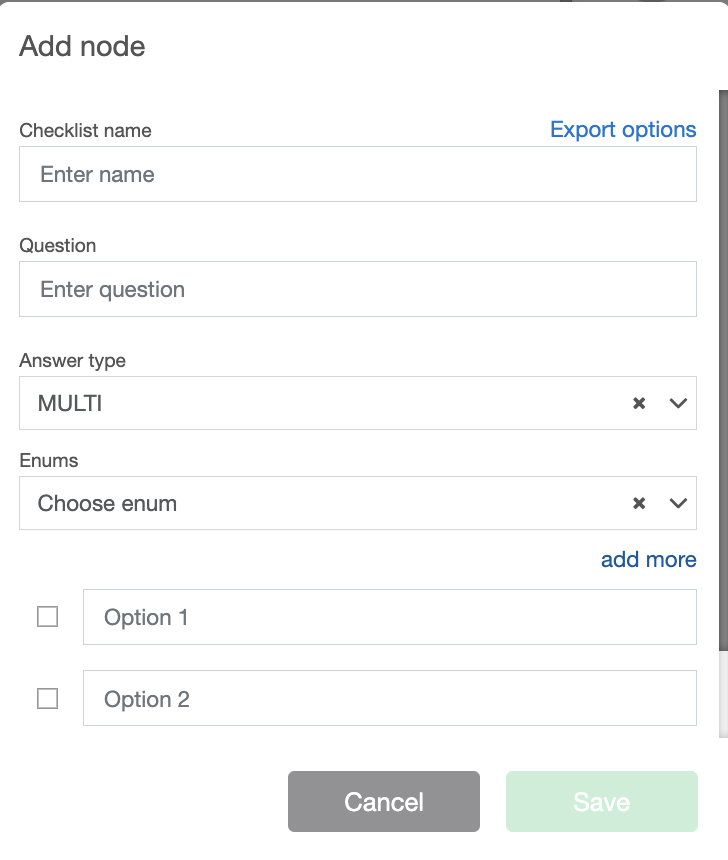
7. If you have chosen a "Single" or a "Multi" type of checklist, you need to provide options for the answers. You can do that by filling in the field Option, and by clicking on the Add more button, adding as many options as you need. 
8. If you want to add a predefined list of answers (options), you can choose an Enum from the list, if not, you don’t need to use that field. (In the Tip below, you can find out more on Enums and how to create them)
9. Once when you enter the Checklist details, click Save.

You have now successfully added the Checklist into a workflow.

Delete

Tip

If you have a list of predefined answers that will be used numerous times, make sure to create the Enum, so you can reuse it just by selecting it from the drop-down menu.

How to create a new Enum:

1. If you are an Admin, in the Administration tab select Settings
2. In the list of Setting options, choose Enums
3. To add a new Enum, click on the blue plus icon "+"
4. Enter the name, and click Save
5. Now select that enum from the list, and on the right click Add value for each option you want to have in the checklist
6. Once you added all the values, click the Save icon in the top right corner
7. Now your Enum is created and set. When creating a new Checklist in your Project Workflow, when you choose the Single or Multichoice type of the checklist, you can choose your created Enum from the list, and options will be automatically populated.

Was this article helpful?

Yes
No
Give feedback about this article

Related Articles

  • How can the admin copy elements from an existing workflow template?
  • How can the admin create a workflow template using import?
  • How to set a watermark to a project workflow?
  • How to set the image resize option

Copyright 2025 – CloseOut.

Knowledge Base Software powered by Helpjuice

Definition by Author

0
0
Expand